Se impartirán conocimientos de tecnologías y enlace a pg que den información de tendencias tecnológicas, también se informara sobre otros aspectos..
Traemos ahora un nuevo integrante para el blog que es el Hacking, algo que esta evolucionando el mundo después de saber que la guerra se puede hacer ya de forma Cibernética.....
Ehtools Framework (Entynet Hacker Tools) es un conjunto de herramientas de penetración para redes WiFi desarrollado por entynetproject. Se puede usar para todo, desde instalar nuevos complementos hasta hacer contacto WPA en segundos. Ademas, es fácil de instalar, configurar y usar. Como todas las tecnologías, el WiFi también tiene algunos problemas de seguridad, especialmente para las redes publicas WiFi. Cualquier intruso puede atacar nuestros dispositivos accediendo a nuestras redes WiFi (puedes hacer una prueba con Wifiphisher). Entonces, debemos analizar nuestra red inalambrica de vez en cuando para evitar ataques de hackers. Existen muchas herramientas para hacer pruebas de penetración de WiFi, pero la herramienta que discutiremos aquí es un poco diferente a las demás. Sobre Ehtools ¿Que es lo que hace que el marco de trabajo de Ehtools sea diferente de otros? Cuando hacemos pruebas de penetración WiFi, tendemos a usar diferentes herramientas para diferentes tare...
Obtener enlace
Facebook
X
Pinterest
Correo electrónico
Otras aplicaciones
CÓMO PROTEGER CUALQUIER SERVIDOR LINUX: PROTECCIÓN AUTOMATIZADA DE SERVIDOR - Parte 2
     ██╗███████╗██╗  ██╗██╗███████╗██╗     ██████╗ ███████╗██████╗
     ██║██╔════╝██║  ██║██║██╔════╝██║     ██╔══██╗██╔════╝██╔══██╗
     ██║███████╗███████║██║█████╗  ██║     ██║  ██║█████╗  ██████╔╝
██   ██║╚════██║██╔══██║██║██╔══╝  ██║     ██║  ██║██╔══╝  ██╔══██╗
╚█████╔╝███████║██║  ██║██║███████╗███████╗██████╔╝███████╗██║  ██║
╚════╝ ╚══════╝╚═╝  ╚═╝╚═╝╚══════╝╚══════╝╚═════╝ ╚══════╝╚═╝  ╚═╝

Automated Hardening Script for Linux Servers
Developed By Jason Soto @JsiTech
---------------------------------------------------------------------------------------------------------
[+] SELECT YOUR LINUX DISTRIBUTION
---------------------------------------------------------------------------------------------------------

1. Ubuntu Server 16.04 LTS
2. Ubuntu Server 18.04 LTS
3. Linux CentOS 7 (Coming Soon)
4. Debian GNU/Linux 8 (Coming Soon)
5. Debian GNU/Linux 9 (Coming Soon)
6. Red Hat Linux 7 (Coming Soon)
7. Exit

2
Escriba 2
[+] SELECT THE DESIRED OPTION
1. LAMP Deployment
2. LEMP Deployment
3. Reverse Proxy Deployment With Apache
4. Running With SecureWPDeployer or JSDeployer Script
5. Customized Run (Only run desired Options)
6. CIS Benchmark Hardening
Exit

1
Escriba 1
[+] Setting some Prerequisites
 [ +++++++++++++++++++++++++++++++++++++++++++++++++++++   ]'universe' distribution component is already enabled for all sources.
 Done.
  To EXIT Press x Key, Press ENTER to Continue
Entonces se mostrará que el componente distribuido universal está habilitado Presione enter para configurar más. Ingrese Y y escriba mysql1 Y luego ingrese a www.testsite1.com
¿Do you Wish to Set a HostName? (y/n): y
Type a Name to Identify this server :
  (For Example: myserver): mysql1
¿Type Domain Name?:www.testsite1.com

Creating legal Banners for unauthorized access
 [ +++++++++++++++++++++++++++++++++++++++++++++++++++++   ]OK
 Done.
  To EXIT Press x Key, Press ENTER to Continue
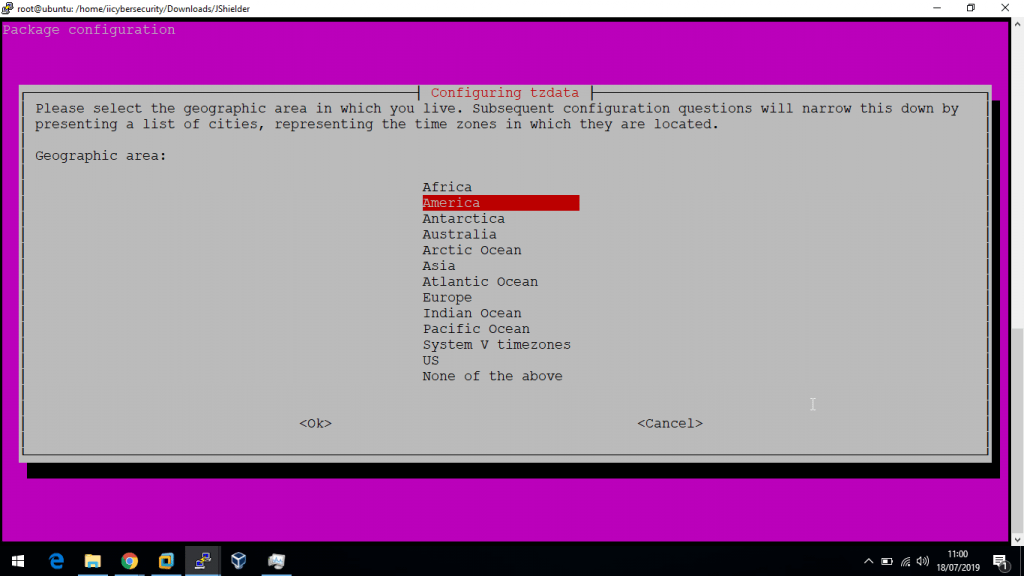
Luego configure la zona horaria
[+] We will now Configure the TimeZone
 Current default time zone: 'America/Los_Angeles'
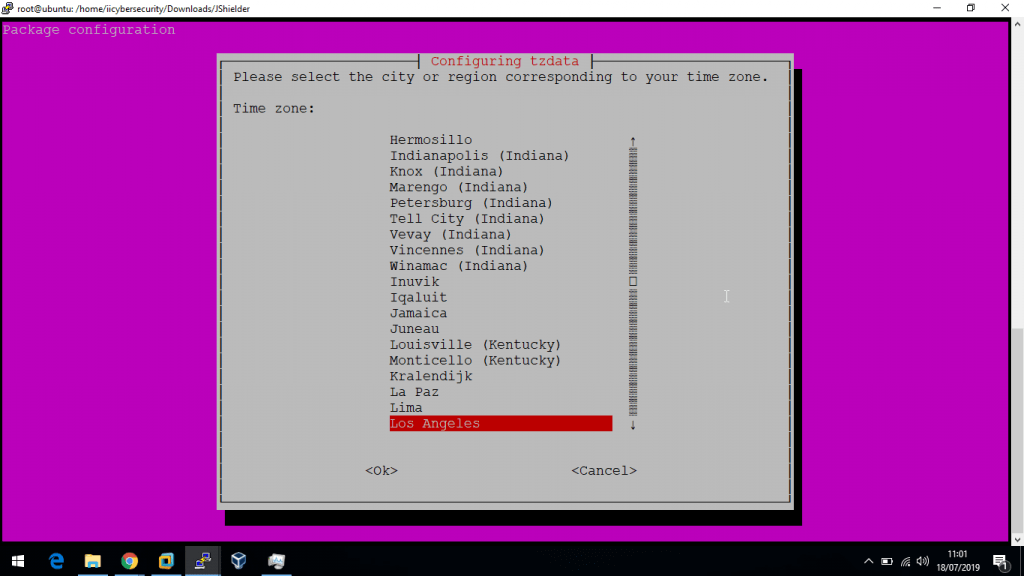
Luego selecciones el país
[+] We will now Configure the TimeZone
 Current default time zone: 'America/Los_Angeles'
 Local time is now:      Wed Jul 17 22:31:34 PDT 2019.
 Universal Time is now:  Thu Jul 18 05:31:34 UTC 2019.
 Done.

  To EXIT Press x Key, Press ENTER to Continue
Entonces el servidor ejecutará una actualización. Este comando buscará actualizaciones disponibles para el sistema e instalará las actualizaciones requeridas
Puede tomar tiempo dependiendo de su velocidad de Internet
[+] Updating the System
Hit:1 http://security.ubuntu.com/ubuntu bionic-security InRelease
 Hit:2 http://us.archive.ubuntu.com/ubuntu bionic InRelease
 Hit:3 http://us.archive.ubuntu.com/ubuntu bionic-updates InRelease
 Hit:4 http://us.archive.ubuntu.com/ubuntu bionic-backports InRelease
 Reading package lists… Done
 Building dependency tree
 Reading state information… Done
 387 packages can be upgraded. Run 'apt list --upgradable' to see them.
 Reading package lists… Done
 Building dependency tree
 Reading state information… Done
 Calculating upgrade… Done
 The following package was automatically installed and is no longer required:
   libllvm7
 Use 'sudo apt autoremove' to remove it.
 The following NEW packages will be installed:
   gstreamer1.0-gtk3 libllvm8 linux-headers-4.18.0-25 linux-headers-4.18.0-25-generic linux-image-4.18.0-25-generic
   linux-modules-4.18.0-25-generic linux-modules-extra-4.18.0-25-generic python3-dateutil
 The following packages will be upgraded:

apport apport-gtk apt apt-utils aptdaemon aptdaemon-data bash bind9-host binutils binutils-common
   binutils-x86-64-linux-gnu busybox-initramfs busybox-static bzip2 console-setup console-setup-linux cpp cups

Done.
  To EXIT Press x Key, Press ENTER to Continue
Después de instalar las actualizaciones presiona enter
 [+] Setting UMASK to a more Restrictive Value (027)
 [ ++++++++++++++++++++++++++++++++++++++++++++++++++++++  ]
 OK
 Done.
  To EXIT Press x Key, Press ENTER to Continue
Jshielder habilitará la seguridad bloqueando o inhabilitando componentes innecesarios
 [+] Disabling Unused FileSystems
 [ ++++++++++++++++++++++++++++++++++++++++++++++++++++++  ] OK
 Done.
  To EXIT Press x Key, Press ENTER to Continue
Ahora JShielder bloqueará los puertos de red poco comunes para restringir el escaneo de fuentes externas utilizadas en las fases de hacking ético de pentesting
[+] Disabling Uncommon Network Protocols
 [ ++++++++++++++++++++++++++++++++++++++++++++++++++++++  ] OK
 Done.
  To EXIT Press x Key, Press ENTER to Continue
Crear nuevo usuario. Ingrese nombre de usuario y contraseña Introduzca el nombre de usuario testuser1 y la contraseña 123456 Ingresa y
[+] We will now Create a New User
Type the new username: testuser1
 Adding user testuser1' ... Adding new grouptestuser1' (1001) …
 Adding new user testuser1' (1001) with grouptestuser1' …
 Creating home directory /home/testuser1' ... Copying files from/etc/skel' …
Enter new UNIX password:
Retype new UNIX password:
 passwd: password updated successfully
 Changing the user information for testuser1
 Enter the new value, or press ENTER for the default
        Full Name []:
        Room Number []:
        Work Phone []:
        Home Phone   []:
        Other []:
 Is the information correct? [Y/n] y

Done.
  To EXIT Press x Key, Press ENTER to Continue
[+] Instructions to Generate an RSA KEY PAIR
 *** IF YOU DONT HAVE A PUBLIC RSA KEY, GENERATE ONE ***
      Follow the Instruction and Hit Enter When Done
      To receive a new Instruction
 RUN THE FOLLOWING COMMANDS  a) ssh-keygen -t rsa -b 4096
Copie y pegue el comando anterior en el mismo terminal y pulse enter
 ssh-keygen -t rsa -b 4096

 b) cat /home/testuser1/.ssh/id_rsa.pub >> /home/testuser1/.ssh/authorized_keys
 Done.
  To EXIT Press x Key, Press ENTER to Continue

Run the Following Command to copy the Key
  Press ENTER when done
  ssh-copy-id -i /root/.ssh/id_rsa.pub testuser1@192.168.1.11
 Done.
  To EXIT Press x Key, Press ENTER to Continue


 [+] Securing SSH
 [ ++++++++++++++++++++++++++++++++++++++++++++++++++++++  ]OK
 chattr: No such file or directory while trying to stat /home/testuser1/.ssh/authorized_keys
 Done.
  To EXIT Press x Key, Press ENTER to Continue
De SSH será asegurado. Luego instalará Fail2ban que funciona como sistema de prevención de intrusos. Su principal motivo es proteger de los ataques de fuerza bruta
[+] Setting IPTABLE RULES
 [ +++++++++++++++++++++++++++++++++++++++++++++++++++++++ ]
 Done.
  To EXIT Press x Key, Press ENTER to Continue

[+] Installing Fail2Ban
 Reading package lists… Done
 Building dependency tree
 Reading state information… Done
 The following package was automatically installed and is no longer required:
   libllvm7
 Use 'sudo apt autoremove' to remove it.
 The following additional packages will be installed:
   liblockfile-bin liblockfile1 lockfile-progs procmail sendmail-base sendmail-bin sendmail-cf sensible-mda
 Suggested packages:
   sendmail-doc rmail logcheck resolvconf sasl2-bin
 The following NEW packages will be installed:
   liblockfile-bin liblockfile1 lockfile-progs procmail sendmail sendmail-base sendmail-bin sendmail-cf sensible-mda
 0 upgraded, 9 newly installed, 0 to remove and 1 not upgraded.
 374 not fully installed or removed.
 Need to get 899 kB of archives.
 After this operation, 4,449 kB of additional disk space will be used.
 Do you want to continue? [Y/n] Y
Luego eliminará python-pyinotifiy e ingrese Y para eliminar la dependencia de python
Use 'sudo apt autoremove' to remove it.
 The following additional packages will be installed:
   python3-pyinotify whois
 Suggested packages:
   mailx monit sqlite3 python-pyinotify-doc
 The following NEW packages will be installed:
   fail2ban python3-pyinotify whois
 0 upgraded, 3 newly installed, 0 to remove and 1 not upgraded.
 Need to get 398 kB of archives.
 After this operation, 2,110 kB of additional disk space will be used.
 Do you want to continue? [Y/n] Y
 Get:1 http://us.archive.ubuntu.com/ubuntu bionic/universe amd64 fail2ban all 0.10.2-2 [329 kB]

Created symlink /etc/systemd/system/multi-user.target.wants/fail2ban.service → /lib/systemd/system/fail2ban.service.
 Processing triggers for ureadahead (0.100.0-21) …
 Setting up whois (5.3.0) …
 Processing triggers for systemd (237-3ubuntu10.24) …
 Processing triggers for man-db (2.8.3-2ubuntu0.1) …
 Setting up python3-pyinotify (0.9.6-1) …
 Done.
  To EXIT Press x Key, Press ENTER to Continue
Luego se instalará mysql
[+] Installing, Configuring and Optimizing MySQL
 Reading package lists… Done
 Building dependency tree
 Reading state information… Done
 mysql-server is already the newest version (5.7.26-0ubuntu0.18.04.1).
 The following package was automatically installed and is no longer required:
   libllvm7
 Use 'sudo apt autoremove' to remove it.
 0 upgraded, 0 newly installed, 0 to remove and 1 not upgraded.
 [ +++++++++++++++++++++++++++++++++++++++++++++++++++++++ ] OK
 Securing the MySQL server deployment.

 Connecting to MySQL using a blank password.\

 VALIDATE PASSWORD PLUGIN can be used to test passwords
 and improve security. It checks the strength of password
 and allows the users to set only those passwords which are
 secure enough. Would you like to setup VALIDATE PASSWORD plugin?

 Press y|Y for Yes, any other key for No:y
Elija la política de contraseña. Ingrese 1
There are three levels of password validation policy:
 LOW    Length >= 8
 MEDIUM Length >= 8, numeric, mixed case, and special characters
 STRONG Length >= 8, numeric, mixed case, special characters and dictionary                  file
 Please enter 0 = LOW, 1 = MEDIUM and 2 = STRONG: 1

New password:

Re-enter new password:

Estimated strength of the password: 100
 Do you wish to continue with the password provided?(Press y|Y for Yes, any other key for No) :y
Ingrese y y elimine el usuario anónimo para mejorar la seguridad del mysql. Esto restringirá el inicio de sesión anónimo en mysql. Según el experto en forense digital de iicybersecurity, algunos administradores de bases de datos dejan el inicio de sesión anónimo, lo que ayuda aún más en los ataques
By default, a MySQL installation has an anonymous user,
 allowing anyone to log into MySQL without having to have
 a user account created for them. This is intended only for
 testing, and to make the installation go a bit smoother.
 You should remove them before moving into a production
 environment.
 Remove anonymous users? (Press y|Y for Yes, any other key for No) :y
Esto depende totalmente del requisito de si se debe dar acceso remoto a la raíz o no. Así entraremos en n
 Normally, root should only be allowed to connect from
 'localhost'. This ensures that someone cannot guess at
 the root password from the network.
 Disallow root login remotely? (Press y|Y for Yes, any other key for No): n
Elimine el usuario de prueba que viene por defecto en mysql. Ingrese y
By default, MySQL comes with a database named 'test' that
 anyone can access. This is also intended only for testing,
 and should be removed before moving into a production
 environment.
 Remove test database and access to it? (Press y|Y for Yes, any other key for No) : y

 Dropping test database…
 Success.

 Removing privileges on test database…
 Success.

 Reloading the privilege tables will ensure that all changes
 made so far will take effect immediately.
 Reload privilege tables now? (Press y|Y for Yes, any other key for No) :y

Success.
 All done!
 Done.
  To EXIT Press x Key, Press ENTER to Continue
Entonces apache en el servidor web
[+] Installing Apache Web Server
 Reading package lists… Done
 Building dependency tree
 Reading state information… Done
 apache2 is already the newest version (2.4.29-1ubuntu4.7).
 The following package was automatically installed and is no longer required:
   libllvm7
 Use 'sudo apt autoremove' to remove it.
 0 upgraded, 0 newly installed, 0 to remove and 1 not upgraded.
 Done.
  To EXIT Press x Key, Press ENTER to Continue
Luego se instalarán los archivos requeridos de PHP
[+] Installing, Configuring and Optimizing PHP
 Reading package lists… Done
 Building dependency tree
 Reading state information… Done
 php is already the newest version (1:7.2+60ubuntu1).
 php-pear is already the newest version (1:1.10.5+submodules+notgz-1ubuntu1.18.04.1).
 php-pear set to manually installed.
 The following package was automatically installed and is no longer required:
   libllvm7
 Use 'sudo apt autoremove' to remove it.
 The following NEW packages will be installed:
   php-cli
 0 upgraded, 1 newly installed, 0 to remove and 1 not upgraded.
 Need to get 3,160 B of archives.
 After this operation, 12.3 kB of additional disk space will be used.
 Get:1 http://us.archive.ubuntu.com/ubuntu bionic/main amd64 php-cli all 1:7.2+60ubuntu1 [3,160 B]
 Fetched 3,160 B in 1s (2,978 B/s)

Preparing to unpack …/python-mysqldb_1.3.10-1build1_amd64.deb …
 Unpacking python-mysqldb (1.3.10-1build1) …
 Setting up python-mysqldb (1.3.10-1build1) …
 [ +++++++++++++++++++++++++++++++++++++++++++++++++++++++ ] OK
  OK
 Done.
  To EXIT Press x Key, Press ENTER to Continue
¿Que es Metasploit-Framework? Metasploit es un proyecto open source de seguridad informática que proporciona información acerca de vulnerabilidades de seguridad y ayuda en tests de penetración "Pentesting" y el desarrollo de firmas para sistemas de detección de intrusos. Su subproyecto más conocido es el Metasploit Framework, una herramienta para desarrollar y ejecutar exploits contra una máquina remota. Otros subproyectos importantes son las bases de datos deopcodes (códigos de operación), un archivo de shellcodes, e investigación sobre seguridad. Inicialmente fue creado utilizando el lenguaje de programación de scripting Perl aunque actualmente el Metasploit Framework ha sido escrito de nuevo completamente en el lenguaje Ruby. Instalar Metasploit-Framework En Termux Hola amigo en estos momentos te explico como debes de instalar Metasploit en tu teléfono móvil Android mediante el Termux... Sigue los siguientes pasos detalladamente y lo podemos obtener como ...
La Comisión Federal de Comunicaciones ha revelado detalles sobre la reforma que pretende acabar con la Orden de Internet Abierto y la neutralidad de la red. Save the Internet El internet está cada vez más cerca de cambiar en Estados Unidos. Desde el pasado mes de mayo, la Comisión Federal de Comunicaciones (FCC, por sus siglas en inglés) y su comisionado ejecutivo, Ajit Pai , están luchando para acabar con la Orden de Internet Abierto de 2015, propulsada por el antiguo presidente de Estados Unidos, Barack Obama, para garantizar la neutralidad de la red. Este término se refiere a que ningún proveedor o compañía sea privilegiado en la red , un aspecto que pretende reformar la FCC para que empresas de internet como Comcast o AT&T puedan bloquear o ralentizar la carga de páginas webs según sus intereses comerciales o empresariales . El Gobierno de Estados Unidos, los reguladores y los usuarios de internet iniciaron las conversaciones para elabo...
Ehtools Framework (Entynet Hacker Tools) es un conjunto de herramientas de penetración para redes WiFi desarrollado por entynetproject. Se puede usar para todo, desde instalar nuevos complementos hasta hacer contacto WPA en segundos. Ademas, es fácil de instalar, configurar y usar. Como todas las tecnologías, el WiFi también tiene algunos problemas de seguridad, especialmente para las redes publicas WiFi. Cualquier intruso puede atacar nuestros dispositivos accediendo a nuestras redes WiFi (puedes hacer una prueba con Wifiphisher). Entonces, debemos analizar nuestra red inalambrica de vez en cuando para evitar ataques de hackers. Existen muchas herramientas para hacer pruebas de penetración de WiFi, pero la herramienta que discutiremos aquí es un poco diferente a las demás. Sobre Ehtools ¿Que es lo que hace que el marco de trabajo de Ehtools sea diferente de otros? Cuando hacemos pruebas de penetración WiFi, tendemos a usar diferentes herramientas para diferentes tare...


Comentarios
Publicar un comentario